

how to arrange photo on the wall: a pro guide to layout
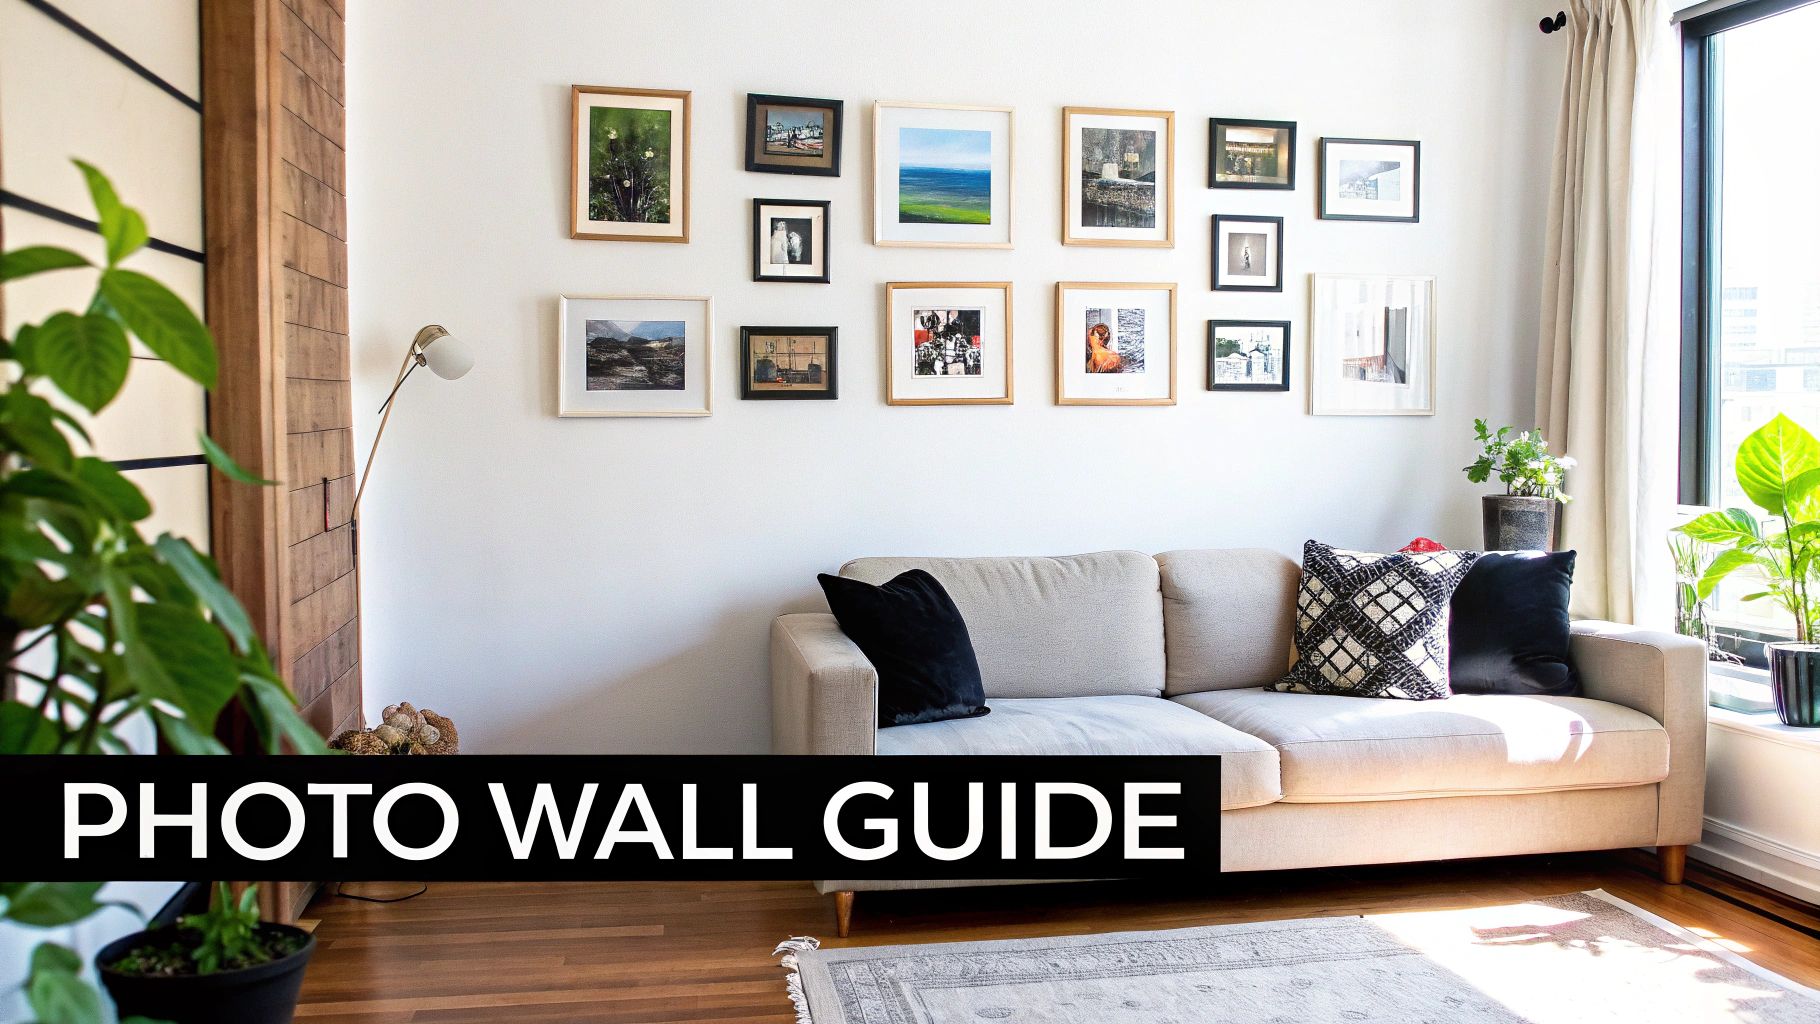
There’s nothing quite like arranging photos on a wall to turn a blank space into the heart of your home. It’s all about telling your personal story through art. The whole process really just comes down to a few key things: gathering the photos you love, picking out frames that work well together, and mapping out a balanced layout before you even think about picking up a hammer. Nail these simple steps, and you'll have a stunning gallery wall that looks like it was put together by a pro.
Turning Blank Walls Into Personal Galleries
A great photo wall does so much more than just fill an empty space—it breathes personality and warmth into a room. Think of it as a visual story of your life's best moments, from that hilarious family vacation to candid snapshots that just make you smile. You don't need to be a professional designer to get that magazine-worthy look. Honestly, with a little bit of planning, anyone can create a display that feels both artistic and deeply personal.
This isn’t just about randomly hammering nails into a wall. A truly beautiful photo arrangement thinks about a few things:
- The Story: Which photos, when you put them together, tell a compelling story about you or your family?
- Balance and Scale: How do the sizes of your frames work with each other and the wall space you have?
- A Common Thread: What’s the one thing that ties it all together? It could be the frame color, a theme in the photos, or even consistent matting.
Why Wall Art Matters More Than Ever
We all have this desire to make our homes feel like us, and it’s a powerful trend right now. In fact, residential spaces account for over 71.2% of the global wall art market—a market that was valued at USD 60.3 billion and is expected to nearly double by 2034. This just shows how much people everywhere want to create homes that are unique and full of meaning. Your photo wall is part of that movement, turning your house into a place that truly feels like home.
A photo wall is your home’s autobiography. Each picture is a chapter, and the way you arrange them is how you tell the story. It's less about strict rules and more about what feels right to you.
At the end of the day, this project is your chance to get creative. Whether you love clean, modern lines or prefer a more eclectic, bohemian mix, we’ll give you the foundation to build on.
If you’re looking for more inspiration to round out your space, check out these unique wall art ideas at https://everone.shop/blogs/news/unique-wall-art-ideas that can complement your photo display. Integrating your new gallery wall into your room's overall vibe is key, and these transformative living room decorating ideas can really help tie everything together beautifully.
Choosing Your Photos and Perfecting Your Frames
The photos and frames you choose are really the heart and soul of your gallery wall. This is where your personality gets to shine, turning a blank wall into a story about you. Don't feel like you have to stick to just professional portraits. Some of the most beautiful arrangements I've seen mix those polished shots with candid phone snaps and meaningful art prints.
A great way to get started is by picking a theme or a general color scheme. You could pull together a collection of black-and-white photos for a look that's truly timeless and classic. Or, maybe a wall full of your most vibrant travel photos is what you need to bring some energy into the room. The real secret is to pick images that you love—that’s what makes a collection feel genuinely yours.
Curating a Cohesive Collection
Once you’ve got your photos picked out, the frames are your next big creative decision. I'm a big fan of mixing different frame styles to create a personal, eclectic vibe. Imagine pairing an ornate, vintage frame you snagged at a flea market with a few simple, modern black ones. That kind of contrast adds a ton of visual interest and stops the whole thing from looking too matchy-matchy.
On the flip side, if you're after a more sleek and polished look, using identical frames is a fantastic way to go. This gives you that clean, grid-like feel that looks incredibly organized and intentional. It's a pretty foolproof way to get a sophisticated result, especially when you want the photos themselves to be the main event.
Pro Tip: Never underestimate the power of a good mat! A simple white mat can make a small 4x6 photo feel so much more substantial and important. It also adds a bit of breathing room between the photo and the frame, which can be the secret ingredient that ties a bunch of different frame styles together.
The Finishing Touches
Picture frames are so much more than just a finishing touch; they're a huge part of home decor. In fact, the global picture frame market was valued at an incredible USD 9.3 billion back in 2022 and is only expected to keep growing. That just goes to show how much we all love framing our memories!
Finally, give some thought to the texture of your prints. Standard photo paper is always a solid choice, but printing on different materials can add a whole new layer of depth. If you have one standout photo you want to make extra special, you might want to explore how to print photos on canvas. It's a great way to introduce a beautiful, textured piece to your gallery. This is your chance to play around, mix things up, and build a wall that tells your story perfectly.
Mapping Out Your Perfect Gallery Wall
Before you even think about grabbing a hammer, let's talk strategy. A little planning goes a long way and is my secret to a stress-free hanging day. Trust me, it’s the best way to avoid turning your beautiful wall into Swiss cheese. The trick? Paper templates.
Simply trace each of your frames onto craft paper or old newspaper and cut them out. A little painter's tape is all you need to stick these paper stand-ins right on your wall. This is a total game-changer. It lets you shuffle your layout around, try out different compositions, and get the spacing just right—all without a single nail hole.
Finding Your Anchor
A great gallery wall has a sense of balance; it feels cohesive, not chaotic. The secret is to start with your largest or most eye-catching piece. This will be the anchor for your whole collection. I always suggest placing this main piece slightly off-center. It’s a subtle design trick that encourages the eye to dance across the entire arrangement instead of just fixating on the middle.
With your anchor in place, you can start building out from it with the smaller frames. To create a really nice visual flow, try placing your second-largest piece diagonally from the first. This helps spread the "visual weight" evenly across the wall.
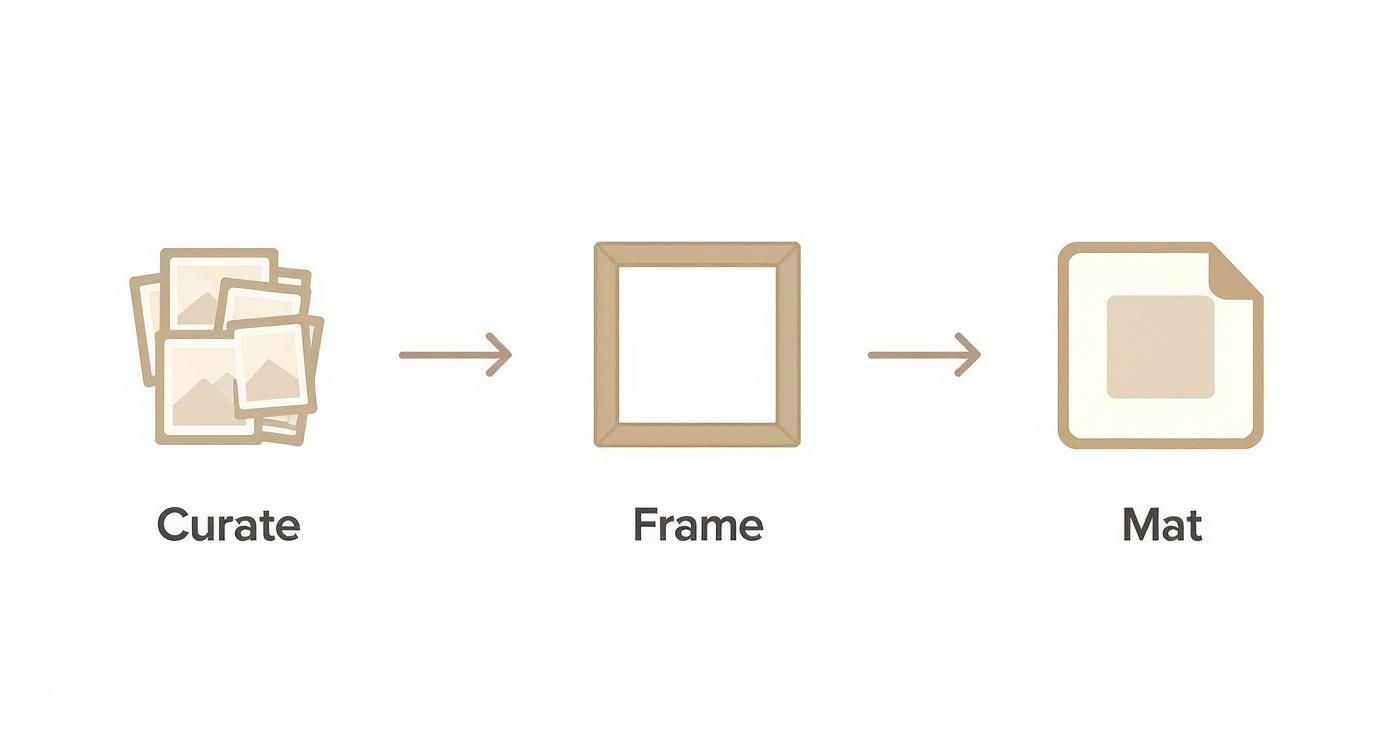
This whole process is about starting with the basics. As this infographic shows, a great wall starts long before the hammer comes out—it begins with choosing your favorite photos and the right frames.
Once you’ve got the prep work down, you can really start having fun. For more inspiration, you can find a ton of creative ideas for a photo gallery wall to get your own ideas flowing.
Getting the Spacing and Height Just Right
Here’s what separates a polished, professional-looking gallery wall from a jumbled mess: consistent spacing. I recommend leaving a gap of about 2-3 inches between each frame. This gives every photo enough breathing room to be appreciated on its own, while still feeling like part of a connected story.
Finally, let's talk height. The most common mistake I see is people hanging their art way too high. Here’s a rule designers swear by: 57 inches on center.
What does that mean? The dead center of your entire photo arrangement (or a single large piece) should be 57 inches up from the floor. This is the average human eye level, and it makes all the difference.
This one simple guideline ensures your art is perfectly positioned for people to actually enjoy it. It creates a much more comfortable and engaging experience for anyone who walks into the room.
If you're working with a tighter space, getting the layout right is even more crucial. You can find some fantastic tips in articles on small bedroom styling ideas that can help you create a stunning photo wall, even when you're short on square footage.
Hanging Your Photos Without the Hassle
Alright, you’ve planned your layout and you’re ready for the best part—getting those photos on the wall. This is where the magic happens, but a little prep work now will save you from a ton of headaches later. So, before you grab a hammer, let's talk tools.
The hardware you pick really matters. For standard drywall, you can't go wrong with classic picture hooks. But if you're renting or just hate the idea of patching up holes later, damage-free adhesive strips are your best friend. A word of caution from experience: always check the weight limits on the package. You don't want to use a lightweight strip for a heavy, beloved frame. It’s a simple mistake, but one that’s easily avoided.
The Painter's Tape Trick
I'm going to let you in on a little secret that completely changed how I hang gallery walls. Forget trying to awkwardly measure from the hanging wire to the top of the frame. Just grab some painter's tape.
- First, tear off a piece of tape and stretch it across the back of your frame, right over the hanging wire or sawtooth hanger.
- Next, take a pen and mark the exact spots on the tape where the nails or hooks will go.
- Carefully peel that tape off the frame and stick it on the wall, right where your paper template was.
- Grab a level to make sure the tape is perfectly straight, then hammer your nail right through the mark on the tape.
This trick is an absolute lifesaver, especially for complex grids. It gives you a perfect placement every single time, no guesswork involved.
My best advice is to take your time. Rushing the hanging process is where mistakes happen. Double-check your measurements, use a level for every single frame, and step back frequently to check your progress.
Dealing with lighter pieces like unframed prints? You have even more options. If you're exploring creative ways to display your art, check out our guide on how to put posters on walls for some great no-fuss solutions.
Taking a moment to hang everything securely and level is what gives you that polished, professional look that makes all the planning worth it.
Creative Ways to Arrange Your Photos
Ready to break out of the standard, rigid grid? This is where the real fun begins. Thinking beyond the basics is how you turn a simple collection of photos into a true showstopper in your home.
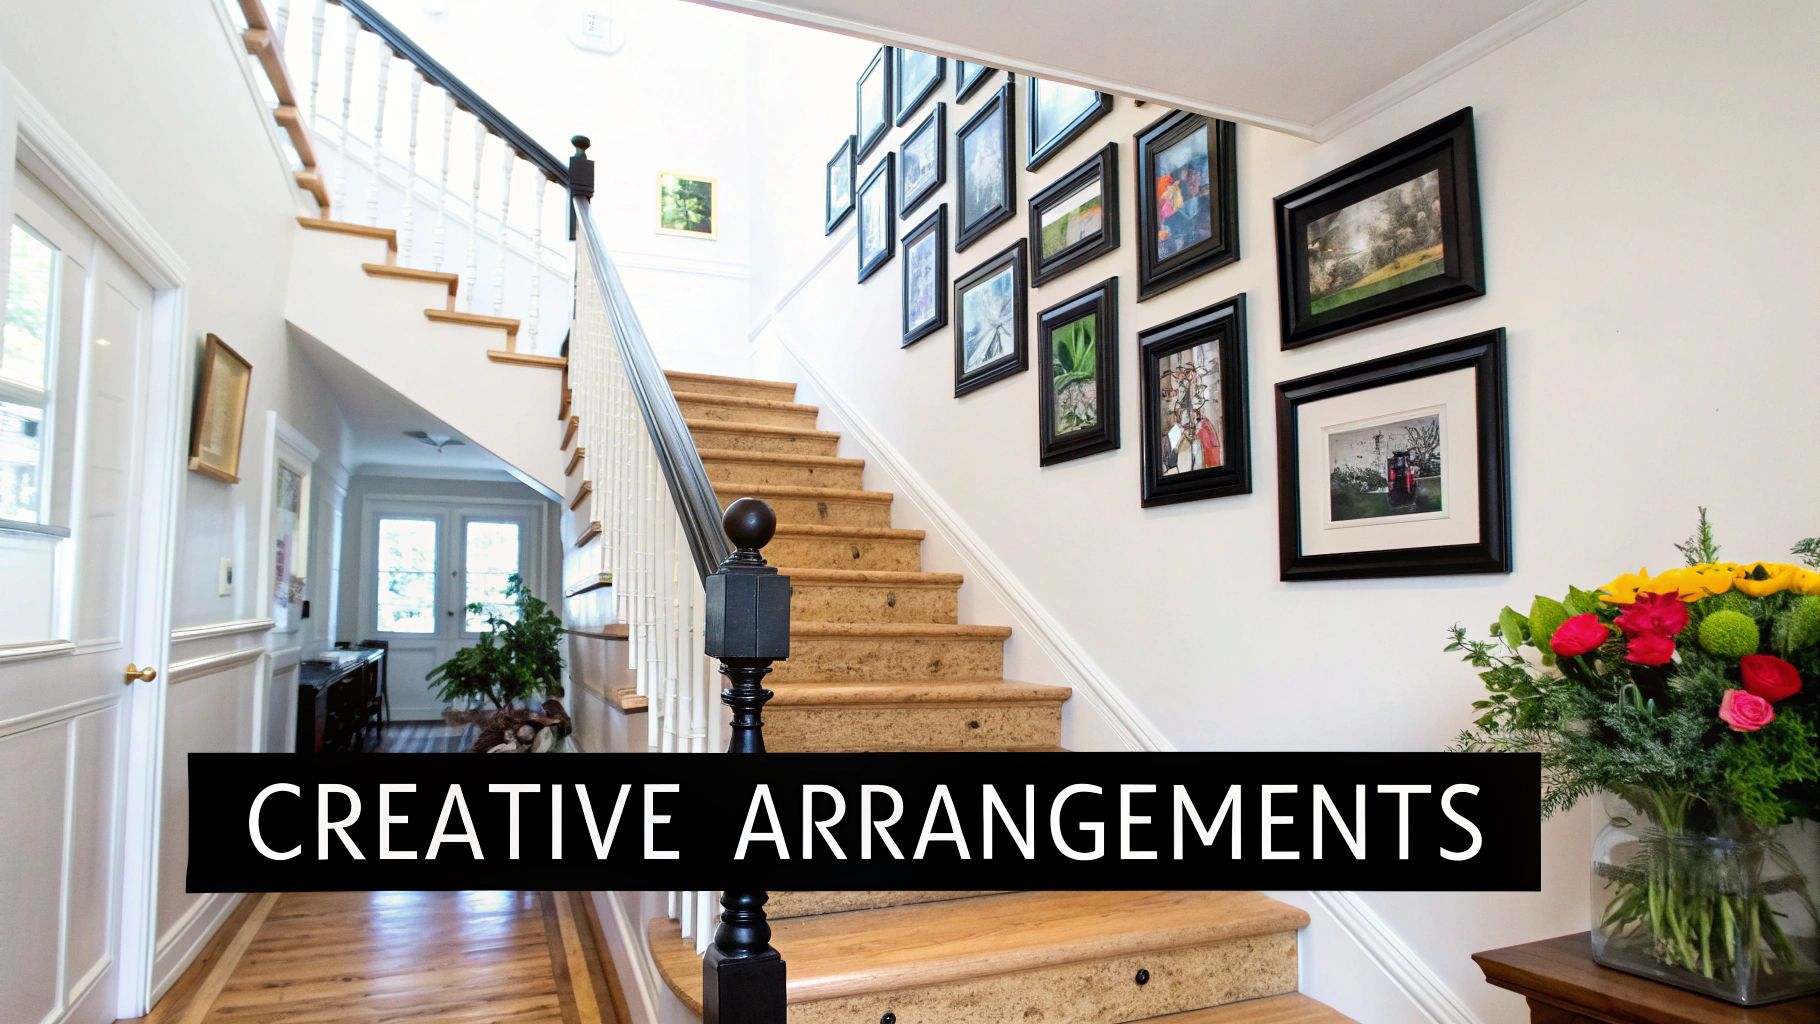
One of my all-time favorite approaches is to let the room’s architecture guide the layout. A staircase, for example, gives you this beautiful natural diagonal to work with. When you stagger your frames to follow the angle of the stairs, you create a dynamic gallery that leads the eye upward and tells a story as people walk by.
Go for an Eclectic Salon Wall
The salon-style hang is for anyone who loves that collected, lived-in vibe. It’s less about perfect symmetry and more about artfully clustering different pieces together for a rich, personal feel.
- Mix it up: Don't just stick to photos. Weave in mirrors, small art prints, or even sentimental objects that have a story.
- Vary your frames: A blend of different frame styles—ornate, modern, rustic, simple—adds so much texture and visual interest.
- Fill the space: This style looks best when it feels full and intentional, covering a good chunk of the wall.
This free-flowing approach is a powerful way to show off your personality. And it's not just us—people everywhere are looking for unique ways to decorate their homes. The wall decor market hit a massive USD 32.68 billion recently and is still climbing, which just goes to show how much we all crave interesting, personal spaces. If you're curious, you can learn about the expanding wall decor market here and see what's driving these trends.
Remember, a display doesn't need to be symmetrical to feel balanced. A great salon wall feels intentionally curated, even with its wonderfully chaotic mix of shapes and sizes.
Think Beyond a Single Wall
Who says your gallery has to stay on one flat surface? For a really clever touch, try wrapping your arrangement around a corner. This is a fantastic trick for smaller rooms or awkward nooks because it creates an immersive feel and can actually make the space seem bigger.
Another brilliant option is picture ledges. These narrow shelves give you total freedom to switch things up without constantly making new holes in the wall. You can easily swap out photos, layer frames, and add little decorative objects whenever the mood strikes. It’s the perfect low-commitment way to keep your display feeling fresh.
Of course, here is the rewritten section with a more human, expert-like tone.
Let's Tackle Those Nagging Photo Wall Questions
So, you've got your photos, you've got your frames... now what? A couple of questions always pop up at this stage, and getting them right makes all the difference.
How High Should I Hang My Pictures?
Here’s a rule of thumb straight from the art gallery world: aim to have the center of your entire photo arrangement hang at 57 inches from the floor. Why 57 inches? It’s the average human eye level, and it just feels right when you look at it.
This little trick prevents that common mistake of hanging art way too high. It ensures your photos are part of the room's living space, not just floating near the ceiling.
What About Spacing and Do My Frames Need to Match?
For spacing, consistency is your best friend. Try to keep a uniform gap of about 2-3 inches between each frame. This gives your arrangement room to breathe while still looking like a single, cohesive unit.
And the big one: do all the frames have to match? Absolutely not! In fact, mixing things up can add so much more personality. A sleek modern frame can look fantastic next to a rustic wooden one. The secret is to create a common thread. Maybe you use all white mats, or perhaps all the photos are black and white. That single unifying element is what will tie your beautiful, eclectic collection together.