

Your Guide to the Perfect Photo Wall Display
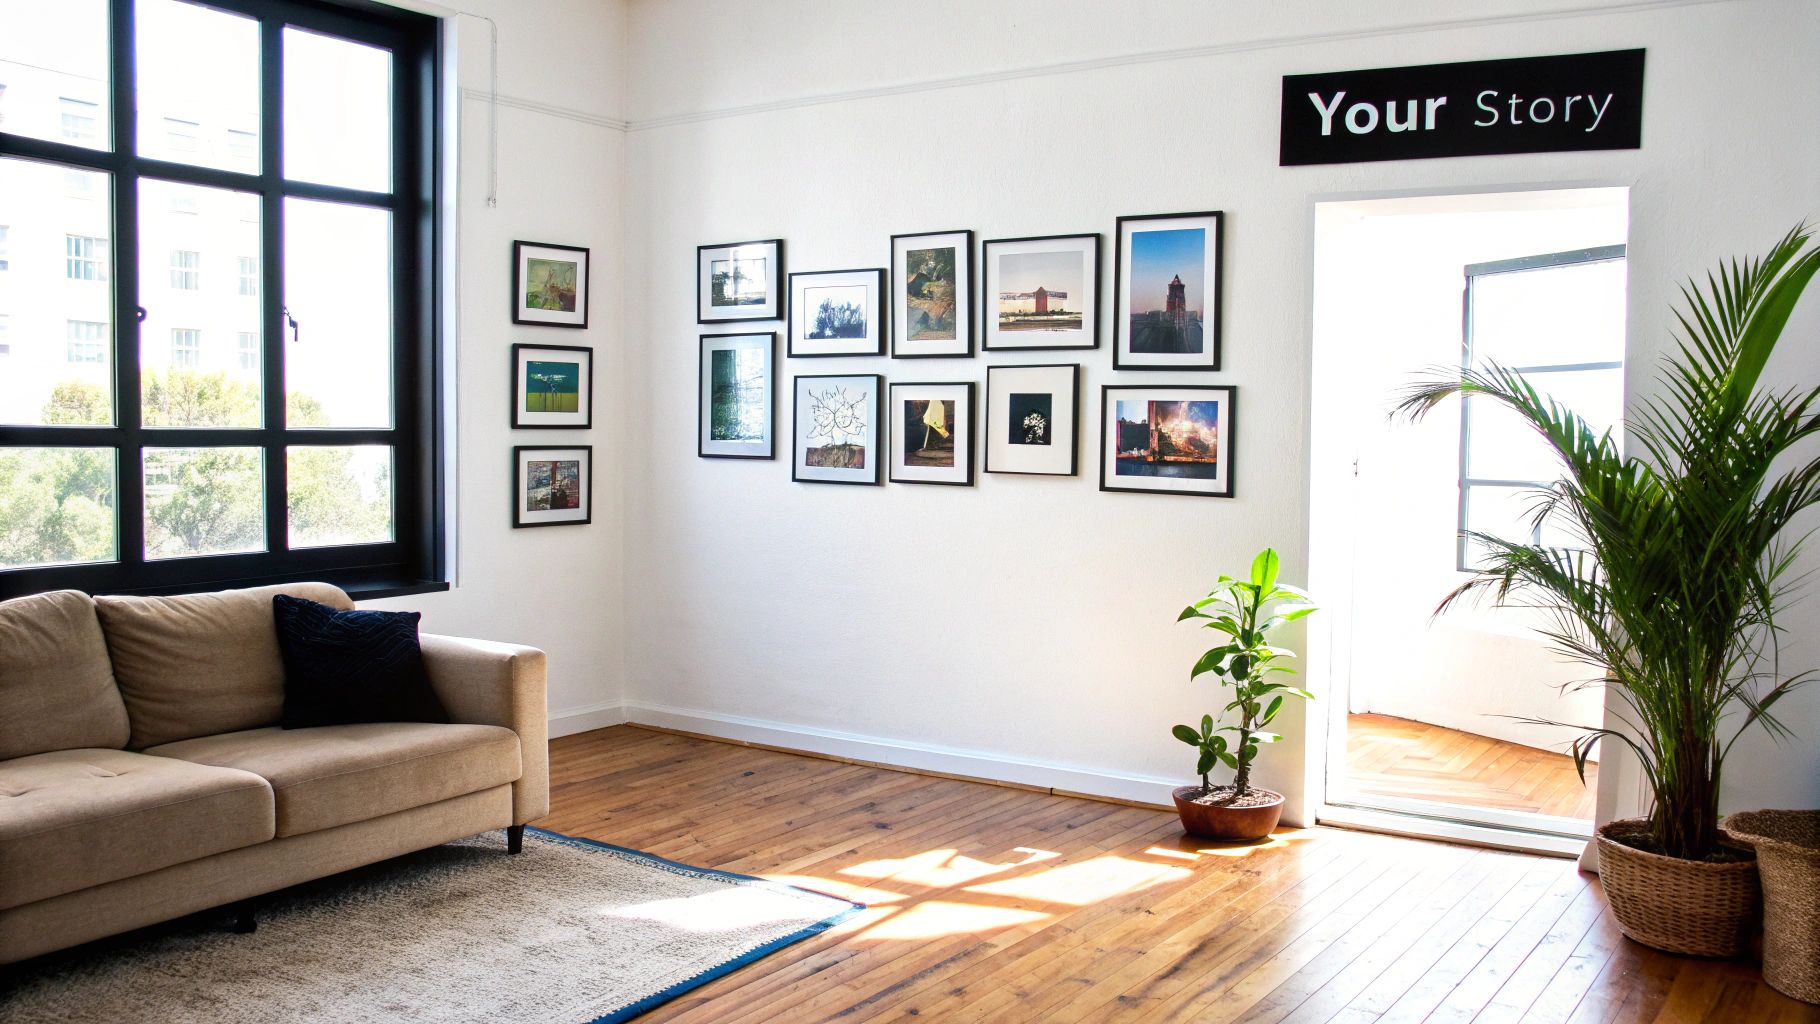
That empty wall in your living room? It's more than just space—it's a blank canvas begging to tell your family's story. A thoughtfully designed photo wall display can transform that bare spot into the heart of your home, filled with personality, warmth, and your favorite memories.
Don't let the idea of creating a gallery wall feel overwhelming. It's actually a really fun project, and way simpler than you might think.
Turn Your Bare Walls Into a Personal Story
A gallery wall is so much more than just decoration; it’s a living, breathing timeline of your life. It’s where you can showcase those big milestone celebrations right alongside the quiet, everyday moments that truly mean the most. Unlike hanging a single piece of art, a photo wall is a dynamic and deeply personal way to express who you are.
It’s your chance to surround yourself with joy, whether that means a collection of goofy family portraits, stunning travel snapshots, or candid pictures of your beloved pets.
The best part about this project is its flexibility. There are no hard-and-fast rules, which gives you total freedom to get creative. You could design something that feels:
- Timeless and Elegant: Stick with a matched set of black frames and classic black-and-white photos for a sophisticated, cohesive look.
- Eclectic and Fun: Mix and match different frame styles, sizes, and colors. This approach creates a bohemian, "collected-over-time" vibe that’s full of character.
- Modern and Clean: Arrange your photos in a tight, symmetrical grid for a polished and contemporary aesthetic.
Why Create a Photo Wall?
We all have thousands of photos sitting on our phones and computers. Bringing those digital memories into your physical space forges a real, tangible connection to them. Walking past a wall of smiling faces or breathtaking landscapes every day is a constant, gentle reminder of the good things in life. It’s how you make a generic house feel uniquely yours.
A photo wall is one of the most impactful ways to personalize your home. It’s a conversation starter, a memory keeper, and a piece of evolving art that grows with you and your family.
Think of this guide as your friendly roadmap. I'm here to take all the guesswork out of the process. We'll walk through everything together—from picking the right photos and choosing frames that nail your style to hanging them perfectly the first time.
You'll even find tons of inspiration, including some amazing family photo display ideas to get your creative gears turning.
So, let's get started. By the time we're done, you'll have the confidence and know-how to create a stunning gallery wall you'll be proud of for years to come.
Curating Photos for a Cohesive Look
The secret to a truly stunning photo wall display? It all starts long before you pick up a hammer. The real magic happens when you curate the stories you want to tell. This is where you get to pull together a collection of images that isn't just beautiful, but feels deeply personal and connected. Your goal is to make a group of individual photos feel like one unified piece of art.
First, think about the vibe you're going for. Are you aiming for something timeless and classic? A whole wall of black-and-white portraits can look incredibly sophisticated and instantly pulls everything together. Or maybe you want a wall that’s bursting with life and energy. In that case, a mix of vibrant, colorful travel photos or candid family snaps would be perfect. There’s no wrong answer here; it’s all about what feels like you.
Finding Your Visual Theme
With a general mood in mind, it's time to find the common thread that will tie all your chosen photos together. This doesn't have to be super obvious—sometimes the most subtle connections are the most powerful.
- A Consistent Color Palette: Try picking photos that share a dominant color. Think earthy tones from a series of nature shots or the cool blues that run through all your beach vacation pictures. This is a surefire way to create harmony.
- A Specific Time Period: What about gathering all your favorites from a single memorable year or that one amazing family trip? This approach tells a really focused and compelling story.
- A Common Subject: You could build a collection around a single theme, like portraits, architectural details, or close-ups of flowers from your garden. This creates a really intentional, gallery-like feel.
My advice? Don’t just grab the first few photos you like. Actually lay them out. You can do this physically on your living room floor or digitally in a folder on your computer. See how they "talk" to each other. Do they feel balanced? Do they tell the story you want to share? This insightful guide on choosing art for your home has some fantastic tips on curating pieces that genuinely reflect your personality, which is exactly what we're doing here.
Preparing Your Photos for Printing
Once you've narrowed it down to your final selection, a little bit of prep work will make a world of difference. If you're mixing in some cherished old family photos, make sure to scan them at a high resolution—I recommend at least 300 DPI—to ensure the print comes out nice and crisp.
And let's be real, many of our best memories live on our phones and social media feeds. If you're pulling from there, check out our guide on printing photos from Instagram to make sure you get great quality.
Here's a pro tip I swear by: apply a simple, consistent filter or edit to every single photo. It could be a subtle warming effect, a vintage-style fade, or a slight boost in saturation. This one small step can make a super varied collection of photos feel like they were made to be together.
This whole process of personalizing our homes is a big deal. In fact, the global wall décor market is projected to hit $85.2 billion by 2035. That number just shows how much we all love making our spaces feel uniquely our own with meaningful photos and prints.
Choosing Frames and Mapping Your Layout
The frames you choose are the glue that holds your entire photo wall display together. They can turn a simple collection of pictures into a unified piece of art that really sets the tone for your room. This is where your personal style starts to shine through.
Think about the vibe you're going for. If you love a sleek, modern look, using identical frames is a fantastic way to go. Simple black or white frames create that clean, gallery-like feel, letting the photos themselves be the main event. This works especially well for super-organized grid layouts.
On the other hand, if your home has a more eclectic or bohemian feel, mixing and matching frames can be incredibly charming. The secret to making a mismatched collection look intentional is to find a common thread. You could stick to a single material, like various wood finishes, or a consistent color family, like different metallic tones (gold, brass, and bronze). This visual link is what keeps the display from feeling chaotic. Once you have your photos ready, you can explore a selection of frames to find the perfect matches for your collection.
The infographic below walks you through the simple process of prepping your photos for their new frames.
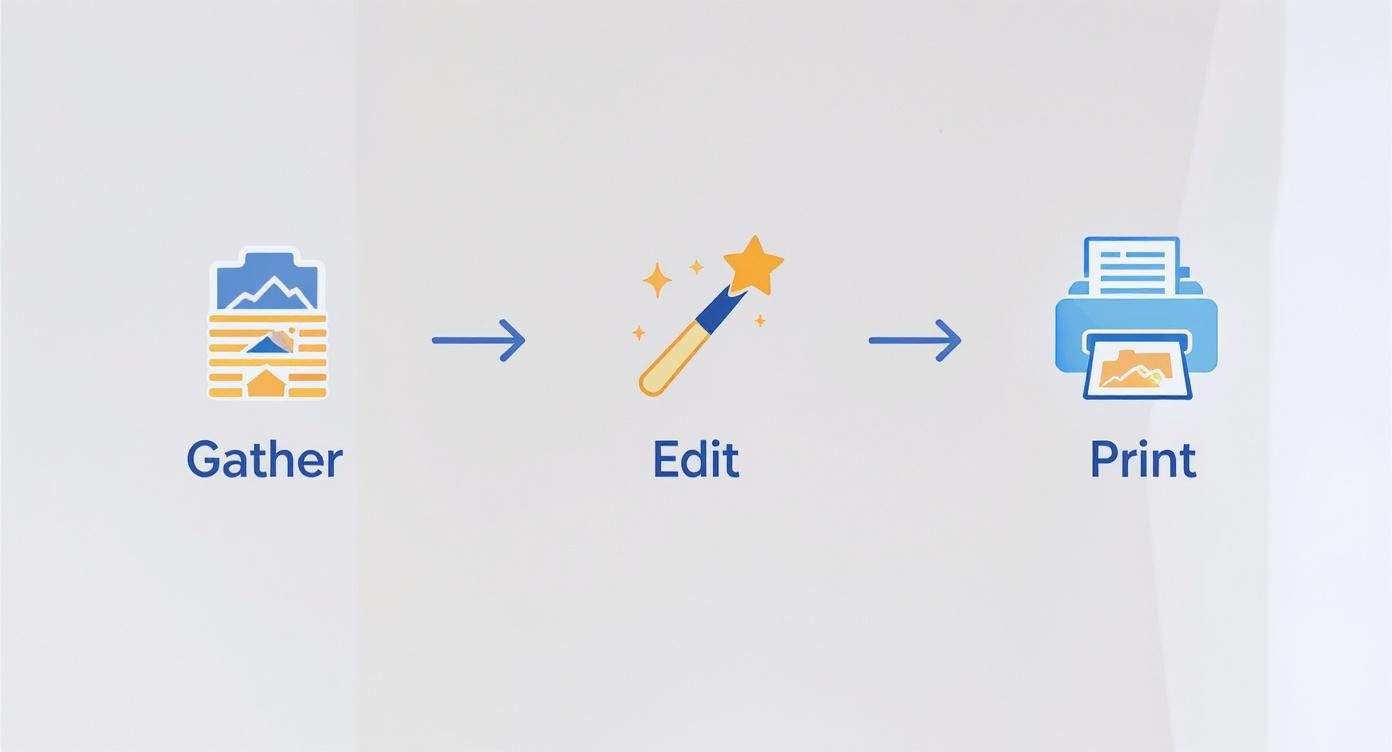
As you can see, it's all about gathering your favorites, giving them a few quick edits for consistency, and printing them in the right sizes for your chosen frames.
Comparing Popular Layout Styles
Choosing a layout can feel overwhelming with so many options. To help you decide, here's a quick comparison of some of the most popular gallery wall styles. Think about your space, your frames, and the overall mood you want to create.
Photo Wall Layout Style Comparison
| Layout Style | Best For | Key Characteristics | Frame Recommendation |
|---|---|---|---|
| Symmetrical Grid | Formal spaces like dining rooms or hallways. Creates a clean, ordered look. | All frames are the same size and shape, hung in a perfect grid with equal spacing. | Identical frames are a must for this style to work. |
| Organic/Salon | Eclectic, casual spaces like living rooms or stairways. Adds personality. | A mix of frame sizes, shapes, and orientations arranged in a balanced but not symmetrical way. | A mix of different frames, unified by color or material. |
| Spine/Centered | Anchoring a piece of furniture, like a sofa or headboard. | A central, dominant piece with smaller frames arranged around it along a central vertical or horizontal line. | One large "hero" frame with a variety of smaller, complementary frames. |
| Linear/Shelf | Renters or those who like to change things up often. | Photos are leaned against the wall on a picture ledge or shelf, allowing for easy updates. | Various sizes work well here; just ensure they fit the shelf depth. |
Each style brings its own unique energy to a room. A grid is classic and calm, while a salon-style wall feels dynamic and full of life. There's no wrong answer—it's all about what you love.
The Foolproof Paper Template Method
Once you've got your prints and frames, it's time to map everything out. Whatever you do, resist the urge to start hammering nails right away! The best way to visualize your gallery wall without making a single hole you'll regret is by using paper templates.
This simple technique is a total game-changer. Just trace each frame onto some paper (kraft paper or even old wrapping paper works perfectly) and cut out the shapes.
This might seem like an extra step, but trust me, it’s the secret to a professional-looking layout. It lets you experiment with different arrangements right on your wall using painter's tape, saving you a ton of frustration.
Arranging Your Layout for Perfect Balance
With your paper templates in hand, you can start playing with the composition. A great way to begin is by taping the template of your largest frame slightly off-center on the wall. This piece will act as your anchor.
From there, build the arrangement out from your anchor piece. I like to place the second-largest piece diagonally from the first to create some visual balance right away. Then, start filling in the gaps with the smaller frames. Make sure to mix up the horizontal and vertical orientations—it keeps the layout dynamic and much more interesting to look at. For more detail on sizing, check out our guide on how to pick a custom canvas size; many of the same principles apply.
Pay close attention to the spacing between each frame. A consistent gap of 2-3 inches between all your pieces is a solid rule of thumb. This negative space is crucial; it gives each photo room to breathe and makes the entire display feel cohesive and polished, not cluttered. Keep moving those paper templates around until you find a layout that just feels right.
Hanging Your Gallery Wall with Confidence
Alright, this is the moment of truth. All that planning is about to pay off. Getting your frames hung securely and perfectly level is what takes a pile of pictures and turns it into a stunning, professional-looking photo wall display. Let's get that masterpiece off the floor and onto your wall.
First things first, let's get your tools together. Trust me, having everything you need within arm's reach before you start is a game-changer. It makes the whole process so much smoother.
- A Reliable Level: Your best friend for avoiding that dreaded crooked-frame look. A classic bubble level works great, but a laser level is a fun upgrade.
- Measuring Tape: Absolutely essential for nailing that consistent 2-3 inch spacing between frames.
- Pencil: To make light, erasable marks on the wall.
- Hammer & Nails/Screws: The right hardware really depends on your frames and what your walls are made of.
- Painter's Tape: The secret weapon for holding your paper templates in place without peeling off your paint.
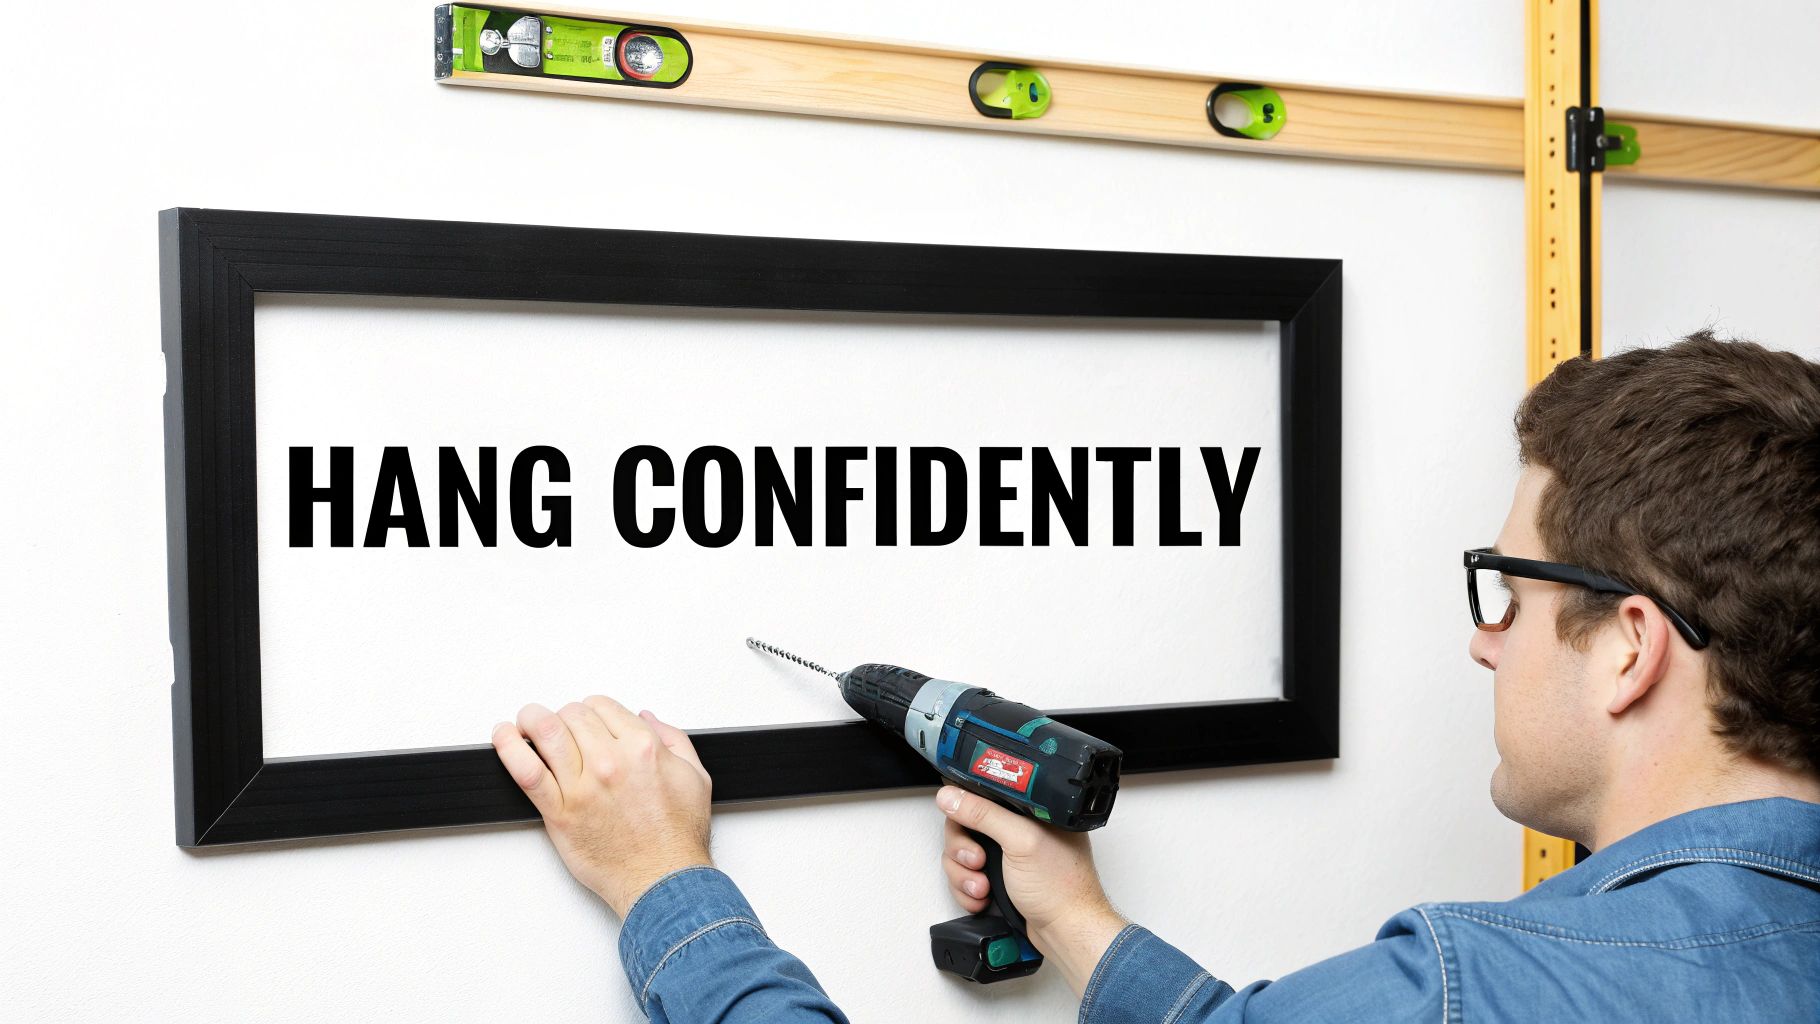
Assuming you've got your paper templates taped up from the layout stage, you're all set to mark your hanging points. This one step saves an incredible amount of guesswork and "oops" holes.
The Toothpaste Trick for Perfect Placement
I love this little hack for getting the nail in the perfect spot every single time. Just dab a tiny bit of toothpaste on the sawtooth hanger or wire on the back of a frame.
Carefully press the corresponding paper template against it. The toothpaste will leave a little mark right on the paper, showing you exactly where the nail needs to go. Now you can just hammer the nail right through that mark. Simple!
Once you've done this for every spot and all your nails are in, you can gently tear away the paper templates. What you're left with is a perfectly positioned set of nails, ready and waiting for your frames.
A quick pro tip: one of the most common mistakes is hanging the whole collection too high. You want the center of the entire arrangement to be at eye level, which is usually around 57-60 inches off the floor. This makes the display feel connected to the room, not like it's floating away.
Tackling Tricky Wall Surfaces
Of course, not all walls are created equal. If you're working with something other than standard drywall, you'll need to switch up your technique a bit.
- Plaster Walls: These can be tricky and prone to cracking. I always recommend pre-drilling a small pilot hole before you even think about hammering in a nail. This prevents the plaster from crumbling.
- Brick or Concrete: This is where you need to bring in the big guns. You'll need a masonry drill bit to create a hole, then pop in a wall anchor to give your screw something solid to grip onto.
For a deeper look at creating layouts that just work, our guide on how to arrange pictures on the wall has a ton of extra tips and visual ideas.
Damage-Free Hanging for Renters
Don't want to make a single hole? I get it. Thankfully, you don't have to. Today's adhesive hanging strips are surprisingly strong and make a fantastic choice for renters or anyone who just loves to change their mind.
Brands like Command Strips are my go-to. They make different sizes for different frame weights, so just check the package. The key is to clean the wall with a little rubbing alcohol first to get a good stick. When you're ready for a change, they peel right off without a trace. It’s the perfect way to get that amazing photo wall display without any of the commitment.
What About a Digital Photo Display?
There's something so special about a physical photo wall display, a tangible collection of moments that you can touch and feel. But let's be honest, in an age where our phones hold thousands of pictures, technology offers a pretty amazing alternative that's worth a look. Digital photo frames have come a long way from those clunky, pixelated gadgets you might remember. Today’s smart frames, connected to Wi-Fi and the cloud, are completely changing the game.
Picture this: you snap a great photo of the kids at the park and, with a few taps on your phone, it instantly appears on a frame sitting on your parents' mantelpiece, hundreds of miles away. That's what these devices do. They create a living, breathing album that keeps you connected and shares life's little joys in real-time. Instead of a static gallery, you get a dynamic slideshow of your favorite memories.
Why You Might Love a Digital Frame
The biggest win here is the sheer number of photos you can display. A single frame can store and cycle through thousands of images. It’s the perfect solution for anyone with a camera roll bursting at the seams who just can't decide which few photos deserve a spot on the wall. No memory gets left behind!
Plus, the smart features that come with modern frames really elevate the experience:
- Sharing from Anywhere: Give family members access, and they can send new photos to the frame from their own phones, no matter where they are. It’s like a private, visual group chat.
- Curated Playlists: You can organize your photos into albums for different moods or occasions. Think "Holiday Memories," "Best of Summer '23," or "Baby's First Year," and switch between them whenever you like.
- Set-It-and-Forget-It Settings: Many frames automatically adjust their brightness based on the light in the room. They can even power down at night to save energy, so you don't have a glowing screen in the dark.
Finding the Right Digital Frame for You
When you start shopping around, you'll see that not all digital frames are built the same. The sweet spot for most people seems to be the mid-size frames, with screens ranging from 7 to 10 inches. This category is so popular that it claimed 55.42% of the global market share in 2024. It’s a great balance of visibility, footprint, and price. If you want to dive deeper, you can check out some of these digital photo frame market trends to see how Wi-Fi models are taking over.
A digital photo display doesn't have to replace your printed photos. Think of it as a companion—a living, breathing way to enjoy the thousands of pictures that might otherwise stay buried on your phone or computer.
As you compare your options, pay close attention to the screen resolution (HD is a must for sharp, clear images), the amount of internal storage, and how easy the companion app is to use. A clunky app can ruin the whole experience. Some high-end models even link up with smart home assistants, letting you control them with your voice. It’s this kind of flexibility that makes a digital frame such a fantastic, modern touch for any home.
Got Questions? We've Got Answers
Even the most seasoned home decorators run into a few head-scratchers when planning a project like this. You're trying to turn personal memories into a piece of art, so it's only natural to have questions! Let's tackle some of the most common ones I hear so you can get back to the fun part.
Where's the Best Place to Hang My Photo Wall?
Finding the perfect spot is all about location, location, location. You're looking for a natural focal point—a wall that draws the eye as soon as you walk into the room. Think about that big, blank space above your couch, the wall that follows you up the staircase, or a long hallway that's just begging for some personality. These high-traffic spots guarantee your favorite photos will be seen and enjoyed every single day.
Lighting is another big factor. Natural light is great, but direct, intense sunlight is the enemy of photo prints, causing them to fade over time. And of course, make sure you have enough space. You want your arrangement to breathe, not feel shoehorned into a corner.
Here's a pro tip I swear by: aim to hang the center of your entire arrangement at eye level. For most people, that's somewhere between 57 and 60 inches from the floor. This little trick makes the whole display feel balanced and intentional.
How Do I Mix and Match Frames Without It Looking Messy?
Ah, the eclectic look! It's one of my favorites, but it can go from "curated collection" to "chaotic jumble" pretty fast if you're not careful. The secret is to find a single, unifying element that ties all the different frames together.
Here are a couple of my go-to methods:
- Color is your best friend. Sticking to all-black frames, all-white frames, or a mix of warm metallics (like gold, brass, and champagne) creates instant harmony.
- Lean into one material. Imagine a collection of wooden frames in all different shapes and sizes, from a light, airy oak to a deep, rich walnut. The shared material makes them feel like a family.
When you're ready to hang them, start with your largest piece. Place it slightly off-center to act as an anchor, then work your way out with the smaller frames. The most important part? Keep the spacing between each frame consistent. A gap of 2-3 inches is usually the sweet spot and makes the whole thing look polished and professionally designed.
Should I Go With Black and White Photos, Color, or Both?
This choice really defines the whole vibe of your wall. There's no wrong answer, but each one tells a different story. A black-and-white gallery is pure classic elegance. It feels timeless, sophisticated, and has this amazing ability to make photos from different eras and events feel like they belong together. It’s a perfect look for a formal living room or a serene bedroom.
On the flip side, a wall full of color photos is bursting with energy and personality. It’s fun, vibrant, and personal—ideal for a family room, kitchen, or playroom where life happens.
Can't decide? Don't! You can absolutely mix them. The key is to create a visual bridge between the two. Try picking color photos that all share a few dominant colors, or use a single, subtle editing filter across all your images before printing them. This will give your entire collection a cohesive, art-gallery feel.
Ready to stop dreaming and start hanging? everone prints is all about turning your digital memories into stunning, high-quality prints that are made to last. Let's get those photos off your phone and onto your wall.